Automatic Wire Stripper – Electric vs Manual Type


An automatic wire stripper is used to remove the insulation from electric wires. This is a tool which makes work easy for electricians. There are two types of automatic wire strippers- electric and manual. They don’t do the same job.

The work a manual automatic wire stripper can do is different from the work an electric automatic wire stripper can do. So before buying an automatic wire stripper, one should know the type of works it can be used for.

Manual automatic wire stripper

If your work involves thin wires less than 10 gauges, a handheld automatic wire stripper will be sufficient for you. People who deal with electronic gadgets and their repair need to solder thin wires and the quantity of their work too is very limited.

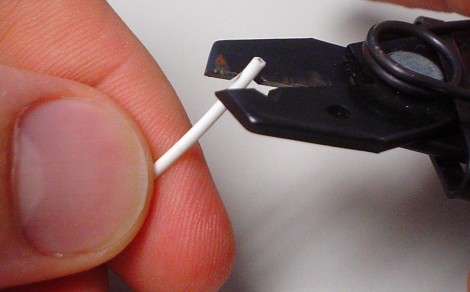
A manual automatic wire stripper is convenient for them because the wire stripping tool can be held in hand like a pair of scissors. The head of the wire stripper is designed in such a way that it holds the wire tightly but doesn’t cut through the wire along with the copper strands inside.

The tool is called automatic because once the wire is fed into it, it will incise the wire insulation and pull it off the wire. The manual automatic wire stripper should be used with extreme care because there are chances to cut through the wire and spoil it if you hold the tool in the wrong way. This is the drawback of a hand held automatic wire stripper in comparison to an electric automatic wire stripper

Electric automatic wire stripper

If the wires you need to strip are thicker, say the size of 10 gauges or more, you need to use an electric automatic wire stripper. It is especially true if you have a large number of wires to be stripped.

Electric automatic wire strippers can remove the wire insulation really fast and your work will be fast and easy if you use an electric automatic wire stripper. These wire strippers don’t cut through the wires and so they are better than hand held automatic wire strippers.

Electric wire strippers are also called scrap wire strippers. An electric automatic wire stripper, if clamped on to a table and secured firmly, will be easier to work with.

Since electric wire strippers can do the wire stripping job very fast, you will be saving a lot of time and trouble in your work. However, remember that electric wire strippers are meant for thicker wires and if you use them for removing insulation off thinner wires less than 10 gauges, you will damage the wires instead of removing the insulation. So use electric wire strippers only if you are working on thick wires.

How to use automatic wire strippers?

When you feed wire into the wire stripper for removing the wire insulation, feed sufficient length of the wire so that the machine can hold it firmly. If the wire fed into it is too short, the wire may slip. Hold the wire stripper firmly in your hand or fix it onto a table.

In case you notice any difficulty with the removal of insulation from the wire, it may be due to the thickness of the wire. Try a thinner wire. Once you know how to use an automatic wire stripper, your wire stripping work will be quite fast and easy.

Why am I writing about wire stripper in a home solar energy blog? Well, when you install your own DIY solar panel, you have to work with wires, right? You might as well learn some of the tools in the market which will help you to do your job faster and easier.
Brill 78371 Razorcut – Why I Love This Baby!

I want to take the time to explain why I love the new Brill 78371 Razorcut mower. On one beautiful Sunday morning as I was looking forward to a day of sleeping in, I heard what sounded like a thundering roar.

As I jumped out of my bed and ran to the window to see what was going on. I noticed that my neighbor Bob was in the process of mowing his lawn with his very old gas lawn mower. So I politely yelled out to him to get an ‘eco’ friendly lawn mower!

However I am sure that he never heard a word that I was saying over that loud lawn mower of his. Right now you are probably asking what exactly is this ‘eco’ mower that I am speaking of?

Well it is a lawn mower that is environment friendly. This means that it doesn’t leave behind any type of carbon footprint and it does not use any type of gas, oil or even electrical current that is generated by coal.

To be quite honest I feel the most ecological lawn mower out there is the classic push and reel type and this is what makes the Brill Razorcut mower stand out.

Now these push reel mowers are not as laborious in any way as one might think. To explain just the other day as I was mowing the lawn with one hand, I was able to hold an open beer bottle using the other. Not to mention that there is peace and quiet, no loud noise when using this lawn mower.

There is also no unhealthy gas fumes heat blasting at you. And forget about the hands tingling from motor vibrations or even mowing over the electrical cord. All of these are a thing of the past with an ‘eco’ mower and plus it has many other things to offer.

Things like being maintenance free – since there is no need to purchase any gas or oil for that matter. You don’t need spark plugs, chains, belts or have to deal with any sort of wiring. And the best part of all is that your neighbors will not hate you for using a loud mower in the on a Sunday morning when they want to sleep in.

Another great feature of the German engineered Brill 78371 Razorcut is that the folds up for easy storage and has a durable rubber foam handle that gives you comfortable when pushing your lawn mower.

Other features that this lawn mower has are blades that stay sharp for at least eight years. So to break it all down, what you have is an ‘eco’ friendly lawn mower that doesn’t make any noise while in use, maintenance free, has eight inch wheels for easy mowing, sealed steel bearings and use no gas or oil.

Seems to me that the Brill Razorcut mower is a great machine to have in one’s lawn care arsenal. You will be happy and your neighbors will be happy. Now you can see why I love this new Brill Razorcut mower. Click on the link below to get the 78371 Razorcut from Amazon.com and have it delivered to your home right now!

==> Click here to get Brill 78371 Razorcut now!

Replacing Home Window Pane – Step By Step Instruction


Household repairs and the maintenance of the house are part of our daily lives. As these tasks we do are part of our daily lives, it is interesting to note that replacing your window pane is also part of our daily lives.

Replacing a broken window at home is not so hard to do, but you have to learn how to do it. You need to consider that replacing a window pane is a job that many people need to do although it can take time. There are a lot of great things about replacing your window, but the one thing you need to know is that there is a way for you to do the job yourself.

You can buy a do-it-yourself window replacement kit that includes the materials you need to replace your broken window. Buying a do-it-yourself kit can save you time and money as well as labor costs.

While there are a lot of different window panes that require a lot of time and effort, you must remember that some window include a lot of artistic designs that makes it special.

If you want to replace your window pane yourself, here are some important points you may want to consider. First, you must remove the old broken glass in your window. This is very important because the glass in your window is very fragile and if the glass is not held properly, you could break the glass.

It is always vital to remove the old glass slowly and carefully. In order for you to remove the glass, you must have with you a set of gloves as well as safety goggles. You can even include a lot of other tools that can be beneficial to the removal of glass in your window.

If any part of the glass is damaged, always be sure to use a hammer and remove the damaged part. If all else fails, you can unlock the window frame and remove all the glass from that window.

Once every single part of the glass is removed, it is important that you must use your putty to scrape the areas. It may be harder for you to use the putty as you replace a window, but the work can be easy if you do it correctly.

Once you apply the putty to the area your replacement window will be located, always be sure to use a hair dryer. This is a way for the putty to become soft. You must be sure that everything including the surface has been clean, the new window can now be installed.

As you prepare for installation of your replace window pane, prepare the window frame and apply the putty. Make the putty even on the sides so that the glass can be put accordingly.

Another important thing is to look for any screws and clips that can help secure your window properly. Then, you must apply a glass sealant and let the sealant dry for a period of time.

After the sealant and putty are dry, you can remove any excess particles by using a chisel. With this chisel, you can scrape any unwanted particles that are not needed. After this, you can clean the surface with water.

If you want a shinier look, be sure to use old newspapers. This can dry the glass very well. It is also important for you to plan it very well and you must know when to begin putting up your replacement window.

You must give it time and focus in order for you to put up your replacement window. Although putting up your replacement window can be hard to do, the job will be fulfilling plus you’ll get to enjoy the benefits of your new window pane.

When you replace a broken window at home, this simple task will actually help you to reduce your home energy bill. With a broken window, warm air are escaping during winter time thus causing you to wasting energy unnecessarily.

As you can observe from the post above, replacing a broken window glass is not hard at at. All it takes is some patience and the right instruction.