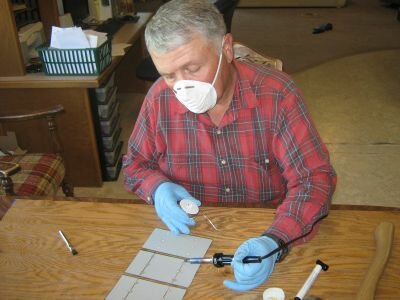
Getting Started On Soldering PV Cells For DIY Solar Panel Construction

<

A solar panel is a set of interconnected construction of solar cells, also called Photovoltaic (PV) cells. The solar panel can be utilized as a constituent of a larger photovoltaic system to generate and distribute electricity for commercial and residential applications.

This post is a brief introduction to Do It Yourself (DIY) solar panel construction, which involves soldering of solar cells together. Although most people are already aware, it is better to know that solar cells are, basically, two types: “tabbed” and “un-tabbed”.

Even though tabbed cells are somewhat costlier, overall, it will work out much cheaper, if one intends to construct more than one solar panel. Besides use of tabbed cells will save a lot of time, the number of broken cells will be much less and because of this, there will not be any scope for irritations.

Solar cells are very delicate and the chances of breakages would be higher if they are handled more frequently or also not handled carefully. As solar cells are very brittle, soldering calls for careful handling and un-tabbed solar cells not only require soldering across a cell but also involves twice the amount of work than that of tabbed cells and the breakage of cells is likely to be much more in respect of un-tabbed cells.

Tabbed solar cells are provided with the metal connector strips connected to the front portion of “sunny side face” of the solar cells. This strip has a free end sufficiently long to position it across the subsequent cell.

These tabbed cell strips will link the front of one cell to the contact point on the subsequent cell and the process is repeated till all the solar cells are interconnected. While the front side of most of the solar cells is negative, the back portion is positive thereby, enabling the electric current to pass through between the cells in the solar panel. As mentioned earlier, the tabbed solar cells are preferred because considerable effort has to be put in to solder un-tabbed solar cells.

The first step in the construction of a solar panel is essentially to solder a new metal strip to the front of each cell before even thinking of interconnecting the solar cells. As the solar cells are delicate, it involves a lot of time to do the difficult job of soldering each cell, especially if these are un-tabbed cells. It is, therefore, advisable to purchase only tabbed solar cells for paneling.

Another important aspect in the construction of a solar panel is to choose a superior quality 65 to 75 watt regulating type soldering iron, which should be set to a temperature of around 700°F. The temperature control is very essential.

If the soldering iron is very cold, solder will not function properly and if it is too hot, the cells are likely to get damaged. However, if someone has purchased un-tabbed cells, one should, as a first step solder a tabbing strip to the “sunny-face” of each of the cells.

There are two methods of doing it; both are, of course, very tricky and difficult. One can either solder the strip directly to the cell using flux, pre-solder or “tin” each strip before soldering it to the cell. The main reason for adopting one of the two methods is to ensure a “solid connection” to the solar cell or otherwise, electric current will not pass through the cells.

Solar tabbing ribbon, normally, comprises 10 to 15 micrometers of solder alloy with 60% tin and 40% lead, known as SN60, coated on a copper strip. As the alloy contains lead, pre-soldering the tabbing strip is a cumbersome process and some people will, therefore, avoid this step.

Flux should be applied either way to the large glittery strips (the “bus bars”) on the front of “sunny face” of the solar cell. The next step is to place the tabbing strip along the fluxed bus bar and with a flat soldering iron, move gradually down the strip. This is a very delicate job. If it is not done properly, the tab strip will come off.

If it is done carefully; the tabbing strip will firmly connect to the bus bar. For this work, the help of an additional hand would be highly desirable. Sometimes, it may be better to practice on a broken cell using an extra strip in order to get an idea of the work involved in soldering.

As there are normally two of these strips on each solar cell, soldering is always a tricky and difficult job. From this, one can easily understand why it is highly desirable to purchase tabbed cells.

DIY Photovoltaic Panel Construction Guide
Do you want to learn how to build your own DIY solar panel at home with a budget of less than $200? If you do, check out the Green DIY Energy program. The program comes with step with step instruction and High Definition (HD) videos on making your own PV panels from scratch. Click on the link below to visit the web site right now.

==> Click here to visit Green DIY Energy now!

Briggs & Stratton Elite Series 30470 First Time User Review

Here’s the question that I really like to know when I was researching the Briggs & Stratton Elite Series 30470 gas powered portable generator – Is it any good?

I have been on the lookout for a long time to find a generator that would suit both my household energy needs as well as meet my budget. Well, I would say I was lucky to stumble upon this one on Amazon.com/.

I was exalted when the price came down that I immediately purchased one. I was pretty excited the day the freight was to arrive. The Elite Series 30470 came on a rolling semi truck that really surprised the quiet neighborhood. The semi truck left after unloading the generator into my garage with a portable fork truck.

The job of assembling the gas generator was not tough, though I still had a complaint or two. The bracket that held the rubber feet was devoid of a hole into which it could be bolted into according to the instructions. This necessitated loosening of a vibration mount to install the rubber bracket.

My assembly of the 30470 did not follow the original instructions, well there was another thing that I remember now. Though the manual said that there was an oil dipstick on the engine, it would be good idea to empty the whole bottle of oil that comes along into the motor.

With a couple of minor problems related to the oil and the gas, the Briggs & Stratton 30470 generator chugged to life. There was no stopping after that, believe me!

Earlier on I had a generator that I had to crank to start, but never again. I strongly recommend this portable gas generator to any woman who does not want to left in the dark high and dry, especially when there’s a row of cloudy days and there’s no sun light to charge up the solar panels.

The generator possesses all the required features and is very easy to operate. You need not be a mechanic or a machine operator to start this generator and get it going. But it weighs over 200 pounds. It is a factor that can really put you off, but do not worry!

Once the generator is on its wheels and the front brackets and rubber pads are attached, it is only the once-in-while maintenance and the firing up that you have to be worried about.

Let me also warn you about the noise that it creates. The noise can mislead you into thinking that something is really wrong with the machine. It is a hunk of a machine capable of churning out 8750 watt when you needed it to. With that amount of power, you can power most of your essential electrical appliances at home when you needed it.

Yes, that is sure noisy! My estimate is that the noise level is pretty much close to 100 decibels. You are surely going to receive some complaints when you run the generator if you live in a residential area.

My complaints about the noise to Briggs and Stratton who referred us to Generac were of no avail. Even changing the muffler arrangement would be out of the warranty agreement, they contended.

Now, I have no other option but build an enclosure around the generator to suppress the noise. This is going to cost me a couple of hundred dollars extra and I am going to have to wait for more time. This is one of the pet peeve I have about the generator.

Though, the most attractive feature that made me purchase the product was the electric start. When I push it for the first place, the generator roared into life easily.

If you are looking to get the Briggs & Stratton Elite Series 30470 gas power portable generator, click on the button on the right to make your order from Amazon.com and have it delivered to your doorstep immediately.

9 Points To Consider When Buying A Power Inverter For Home Solar System

Whether your home solar power project is a Do It Yourself (DIY) or readymade kit, you will require an inverter to convert Direct Current (DC) power into Alternating Current (AC). Reason being, most modern household electrical equipment runs on AC.

Inverters can be very expensive and are therefore an important factor in your project. If the solar system is to provide power at a remote location as a small farm or “new forest house”, then you need to buy one that suits your needs.

Begin by looking at the type of appliances and what the charges will be. Check the power requirements and continuous discharge current. You can find cheaper modified square wave inverter to do the job instead of sine wave units which are more expensive.

While you can buy cheap inverters, most people would agree that you get what you pay for, so here are 9 tips when comparing units.

1) Safety measures

Many people put this as a final consideration, however, you must consider the security aspect of the unit you intend to purchase. You need to know if the inverter complies with all relevant safety standards and RFI in the country you live in.

2) Power output

Check the power output of the inverter unit. Note that larger units may not meet your household energy needs. Find an inverter that provides information about the continuous, intermittent (30 minutes), and overvoltage category. Larger inverters can be less efficient at very small loads than smaller inverters.

Lightweight transformerless inverters cannot have the capacity to handle peaks load period. Look for units that fit your needs for energy rather than capacity.

3) Type of wave

The best power inverter produces a pure sine wave. Many inverters that are cheaper are called “modified” square or sine wave unit. While the square wave units are cheaper, some devices such as fans, washing machines, stereos, digital clocks and timers do not work as well and will run slower, hotter or louder than a pure sine wave unit.

4) Power pending

The inverter has a standby or autostart. This can significantly reduce their energy consumption, without this feature, the unit can take a lot of energy from your battery bank. Also check the amount of power used when the inverter is waiting to detect a small charge.

5) Input management

When your solar panel system is in operation and the batteries are charging, the output can vary from a low of perhaps 10 volts to 15.5 volts. A good inverter must operate with input voltages between 10 and 16 volts.

6) Distortion

Make sure that the inverter maintains its output frequency by 0.01% and less than 4% harmonic distortion. You should also check that the inverter can maintain its output voltage AC within 3 – 5% of the desired tension.

7) Efficiency

Ask how efficient the inverter is given the specifications of “maximum efficiency” or demonstrate how it is done with small loads of 50 to 100 watts to rated power.

8) Diagnosis mode

What on board diagnostic does the inverter has? You can identify low and high battery, overload and overheating with certain internal diagnosis system.

9) Warranty coverage

What kind of warranty on the unit and what the service agreements are? Try to look for inverter manufacturers with service centers as close as possible. Also, look for a long period of warranty and local service.

Are you looking for a high power output inverter for your home solar power system? If you are, check out the Power Bright PW1100-12 inverter from Amazon.com/. It has a power output range of 1100 watt which pretty much can power all your electrical equipment. Click on the button on the right to buy the PW1100-12 from Amazon.com now!