Energy Star Electrical Devices – Should You Invest On Them?


As the energy costs go higher, it has become imperative that a serious thought is given on energy saving appliances. While going in for energy saving appliances, either you are buying for the first time or planning to replace your existing appliance which is outdated, it would be advisable to confirm that the brand you are going in for meets with international standards.

With Energy Star in market, one need not look further as it is of international standard in the world of energy efficient equipment. Ever since the US Environmental Protection Agency created it, to be precise since 1992, several countries, with U.S. and Australia included, are using it.

You might have come across other similar labels such as EU Energy Label and the UK Energy saving Recommended Label. As all the countries realize the importance of energy saving methods, Governments are joining hands with national energy saving programmes so that the energy saving equipment are put to use both at home and in business.

Let’s have an idea of how energy saving equipment function. By automatically switching the equipment into a ‘sleep’ mode when unused and switching to ‘standby’ mode the device effectively reduces the power consumption. With an improved technology we see that most of the office equipment are potentially capable of saving energy this way, but not all machines, to be particular, PCs are enabled to saving energy in this manner.

You may request your IT or maintenance staff to assist you in this regard. However, if you go in for Energy Star Home electronics products you could be assured that you are saved the trouble as they have energy saving features inbuilt.

When compared to standard products, your TV, VCR or DVD if they are of Energy Star standard, will significantly reduce energy consumption as it will consume around 75% less energy in standby mode. When an electrical appliance is switched off or not performing its primary function and if it is consuming electricity, it is termed as ‘standby’ power. It is considered as leakage, sometimes termed as vampire or phantom electricity.

The problem could be avoided with Energy Star standard as if your electronic gadgets comply with Energy Star standard, you can be assured that it will automatically switch off into a power saving sleep mode after a given time.

Where computer is concerned, you could see that the monitor goes dark and as far as the components are concerned, like the hard disk and main processor, two thirds of the power used will be reduced automatically. It is for you to choose the time the equipment is going to take to ‘go to sleep’.

On pressing a key or moving your mouse you can wake up your computer from sleep and start working on it. It is as simple as that.

Well, it is a known fact that the best way to affirm that when idle an equipment does not consume electricity will be to turn it off at the power point which would also save you money and very much reduce fire hazards.

The proportion of standby power is an overwhelming 12% of household electricity consumption in developed countries. 5 megatonnes of Greenhouse gas emissions are let out annually in Australia which is due to standby power costing consumers around 500 dollar million every year.

According to statistics taken, 1% of global greenhouse emissions is due to standby power. This is due to malfunctioning of energy used by products on standby. For features such as internal clock, activation of remote control and maintaining memory, minimal amount is needed.

However, most of the standby power is only wasted energy. To cut down on the waste it would be advisable to go in for Energy Star or products that are similarly enabled to deal with energy saving.

Before you install a home solar power system, it is best you upgrade the old electrical devices into Energy Star product. There is no point trying to supplement your home energy use with solar power when your electrical equipment are not energy efficient.

If you need help to build your own Photovoltaic (PV) panel on a limited budget, check out the Power4Home program by John Russel. Read up on the Power4Home review on this blog to understand what the program has to offer.
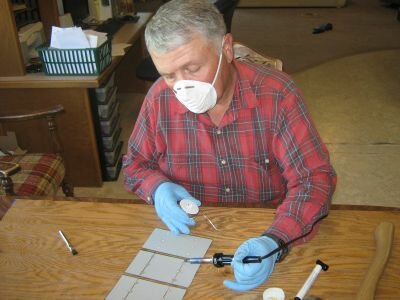
Soldering Photovoltaic PV Cells Together Tips For Beginners


Here is a brief introduction to the process of soldering Photovoltaic (PV) solar cells together. You may be aware that both tabbed and un-tabbed solar cells are available in the market. Though tabbed cells are expensive, it better to use them if you are planning to build many panels.

Not only will you save time, but also benefit in terms of less number of broken cells and frustration. Since the solar cells are very fragile, the chances of breaking them are more. The number of broken cells will be more if you handle more number of cells.

It is important to carry out soldering with utmost care. This is because un-tabbed cells are required to be soldered across a cell. In the case of un-tabbed cells, the work involved is almost double and, therefore, the chances are that you will break some cells.

The free end of the top, sunny-face, tabbing strip is soldered to the bottom of the next cell. This process is repeated down the string. It is, therefore, important to arrange the cells according to the panel layout or design.

For example, it could be 3 strings of 8 cells each or whatever is the design. A gap of 1 centimeter has to be left between each of them. You can, in fact, make a cardboard or masonite template that represents the size of the array box to arrange the strings neatly.

After tabbing the tops, flip them over so that the sunny-side comes down. The tabbing strip can be slipped out from the first one so that it lies over the back of the next. This is to be repeated all the way down the string.

The strip is to be soldered to the contact points on the back of the cells. If you are using cells that look like the ones that I have used, you will see 6 small whitish contact squares.

Flux can be applied to the contact spots after ensuring that tab strips are properly lined up and are sitting over the contact spots. You will have to hold the hot soldering iron to the strip on the spot, touch the solder wire to the point and allow the solder to flow.

Extreme care has to be taken to ensure that too much solder is not applied and the contact is not overheated as it can damage the cell. There is one more way to do this. You can use solder paste on the contact, lay the tab on and keep the iron on the point till it flows. I found this to be a better way of doing it.

This is to be repeated for all the six contact points to have the two cells connected. The whole process has to be done for all the solar cells in the string. Finally, it is important to check that the solder connections have been done properly. This can be done by exposing the cells to light and measuring the output voltage.

It is worth checking at least each string. Otherwise it will be too late to check and rectify. After soldering the string of solders together, you will find that the top tabs are free at one end of the last string.

A short length of tabbing strip will have to be soldered to the back of the first top cell to complete the circuit. There you are! You have a completed a string of solar cells for your use. The number of strings of cells required per panel will depend on the voltage that you want.

It is fun to build your own solar panel, but some work is involved. You may opt to buy a solar panel if cost is not a factor and you don’t have patience.

Do you want to know how to build your own solar panel on a $150 budget? If you do, check out the Power4Home ebook by John Russel. For more information, read up on the Power 4 Home review written some time ago on this blog.

The Tools You Will Need In Your Garage For A Home DIY Project


Today shops are offering you convenient tools for you to choose from according to your home DIY job requirements. Thus buying a tool that you require is easy, but at the same time it is important that you make the right choice that suits your homemade solar power endeavor, lest ruin your project. Here are some of the tools you will need in your garage.

The humble cordless drill.

The primary job a drill as the name suggests is to drill holes into materials, but they can be used to fix or attach things by putting in screws, i.e the Plexiglass cover on the Photovoltaic (PV) panel. Because of operational ease, most of us like to use a cordless screwdriver, rather than one with a cord for power supply.

This is a handy tool for taking out screws because of their magnetic tip; there are no spilled screws and the interchangeable heads like the common flat headed one to the Phillips head. This also reduces the number of tools required to do a job. With the cordless screwdriver, you don’t have to worry about a loose fitted screw anymore.

The edgy saw.

Saws are a much required tool for anybody working with wood and no matter what type of wood you are working with; there is a definite need for some kind of a saw.

Be it cutting the beam in to the right size, cutting the edges, cutting firewood, cutting limbs of a tree or to make a hole in the centre of the wood without disturbing the edges, there is a type of saw to do the job.

Due to the shearing power and razor sharp cutting edges, saws are one of the dangerous tools which has to be handled with great care for your own safety and who works besides you.

The artsy router.

I like specialized woodworking tool such as a router when I am working with timber. I can trim the wood or create distinct patterns in the wood giving form to my imaginations. With some add-ons, you can create a great piece of art work.

But there is difference of opinion about the user friendliness of router tools. Once you have mastered the way to use them, you will simply adore it; on the other hand if you don’t know how to use them correctly you will think that you can do your work without them. With their efficacy and simplicity, you can complete your residential solar energy project easily and faster with a sander.

The smooth sander.

For a neat and smooth finish it is necessary to use a sander first, before painting a surface. There are various shapes and sizes of sanders to choose from as per the job requirement and they are available at a comparatively lesser price. You can use either sand paper or sand discs in a sander.

The sandpapers are available in various grades ranging from very coarse to a super fine grade. It is important that before making a selection, from a wide variety of tools, make a good study about their usefulness in your job.

Do not make a hasty decision of buying a tool that you come across first. By purchasing a tool that is versatile which could be adapted for your various projects, you can reduce the expense of purchasing a tool every time you want to do a project.

Referring to the testimonials available from the users will help you to ensure that you are buying exactly the tool which you have in mind.

Getting Started On DIY Solar Panels

Are you planning to buy readymade PV panels or save money by building them yourself? Since you have the tools, you might as well construct them yourself. What you will need is a good instructional manual.

To get started, head over to Michael Harvey’s Earth4Enery download page and get his PDF guide together with the High Definition (HD) instructional videos on how to build a solar panel on a shoestring budget.

==> Click here to visit Earth4Energy now!